How to track email marketing with Google Analytics 4
Everything in marketing comes down to numbers and your email marketing program is no different. Discover how to track and measure what your customers do after they click on your emails with UTMs and Google Analytics 4.
Everything in marketing comes down to numbers. How many people are you reaching? How many conversions did a campaign achieve? What’s the return on ad spend for the most recent Facebook campaign???
Depending on the email service provider (ESP) you use, it’s likely that you have some basic metrics by which you measure campaigns. But there’s still a huge gap of information in between the send and a final conversion on your site that Google Analytics 4 can help you bridge.
Let’s look at how you can set up GA4 to measure what happens after someone clicks through to your site. Then, we’ll explain how you can create custom links to get incredible insights about the performance of individual list segments, campaigns, calls to action, and more.
Most ESPs provide a rundown of information about how subscribers interacted with your campaign. With Sinch Mailjet, for example, you can track these common email metrics:
Sent: The proportion of emails that have actually left the sender server to reach your recipients.
Delivered: The proportion of sent emails that have landed in the recipient’s server.
Open rate: The percentage of delivered emails that have been opened at least once.
Click-through rate: The percentage of opened emails that have been clicked on at least once.
Soft bounce rate: The percentage of emails sent that didn’t reach their intended destination for a temporary reason (full inbox, etc.)
Hard bounce rate: The percentage of emails sent that were not delivered because of a permanent reason (like the address doesn’t exist).
Unsubscribe rate: The percentage of recipients who clicked on the unsubscribe link.
Spam rate: The percentage of delivered emails that result in a spam complaint from recipients.
While this is all valuable information, it doesn’t allow you to see what happens beyond that click on your campaign. And in the case of trying to track email opens, this kind of data is becoming less useful and less accurate for advanced decision making in a competitive marketing landscape.
Understanding how subscribers behave u003cbu003eafter they click through to your site u003c/bu003eallows you to measure the effectiveness of your campaigns and make improvements more accurately.
How to track emails beyond the click with Google Analytics 4
Despite all the controversy, Google Analytics is still probably the most popular data analytics platform. If you know how to use it, the same free software you use to gain insights from organic traffic, paid search campaigns, and more can open the curtain to what happens once an email subscriber lands on your site.
Beginning u003cbu003eJuly 1, 2024u003c/bu003e, Google u003ca href=’https://support.google.com/analytics/answer/11583528’u003ediscontinued its legacy Universal Analytics platformu003c/au003e, replacing it with Google Analytics 4 (GA4). For more information on how to make the switch to GA4, Google put together a detailedu003ca href=’https://support.google.com/analytics/answer/9304153?hl=en’u003e guideu003c/au003e on account set up and property creation.
Default email traffic tracking with Google Analytics 4
For years, you could see certain information about traffic that was generated from emails, just like you could other broad traffic sources. For example, you could see the bounce rate of that traffic, the average number of page views, and session duration.
The problem with this default setup was twofold:
The data provided was somewhat basic, unless you created an intricate set of goals and advanced tracking methods. It led you to make inferences from limited information. Subscriber behavior between landing on your site and making a conversion was murky at best.
All “email” traffic was lumped into a single category. There was no way to determine which messages generated results unless you set specific tracking codes for each campaign.
Luckily, you can overcome both limitations with a combination of the new capabilities in Google Analytics 4 and proper tracking of links using a few simple tags.
Google Analytics 4: Improved measurements for all digital marketing
In Google Analytics 4 (GA4), there’s a much greater emphasis on engagement and the behavior flow of visitors, both in a single session and through repeat visits. This advancement, once you learn how to work with the data, is a huge boon to your marketing efforts across all disciplines – from social media marketing to organic search, email, and more.
For users that haven’t signed a u003ca href=’https://support.google.com/analytics/answer/11202874’u003e360 contractu003c/au003e for Google Analytics 4 properties, u003ca href=’https://support.google.com/analytics/answer/7667196?hl=en’u003eGoogle Analytics’ data retention policyu003c/au003e set a maximum data retention period of 14 months, making it hard for teams to do year-over-year comparisons.
Events and conversions: Your starting point for incredible insights
Now, when you log into Google Analytics 4, you’ll see a whole slew of “events”, which are specific visitor actions. There are a number of events that are available by default.
Some of these fall under “enhanced event measurement” which offer greater control over tracking. You can enable these within your account without working with an additional tracking code or development languages like HTML or JavaScript. All you have to do is follow this step-by-step process:
Step 1 – Go to your Google Analytics account.
Step 2 – Select Admin.
Step 3 – Confirm you’re viewing the account and property you want to control.
Step 4 – In the Property column, click data streams → Web.
Step 5 – Switch the Enhanced measurement toggle to the on position to allow all measurements. Click the gear icon to edit individual tracking preferences.
The automatically collected events (web only) in Google Analytics 4 are:
Click: Measures link clicks that lead away from the current domain.
File_download: When a user clicks a link leading to files (with a common file extension) like documents, text, presentations, videos, and audio.
Form_start: The first time a user interacts with a form in a session.
Form_submit: When the user submits a form.
Page_view: Each time that a page loads or the browser history state is changed by the active site.
Scroll: The first time a user reaches the bottom of each page (when 90% of vertical depth becomes visible).
Session_start: When a user engages with the website.
User_engagement: When the webpage is in focus for at least one second.
Video_start: When the video starts playing.
Video_progress: When the video progresses past 10%, 25%, 50%, and 75% duration time.
Video_complete: When the video ends.
View_search_results: Each time a user performs a site search.
Note that even though GA4 tracks external link clicks automatically, it does not automatically track internal ones. To track internal links, you’ll want to u003ca href=’https://support.google.com/analytics/answer/10085872?hl=en’u003ecreate and add custom eventsu003c/au003e.
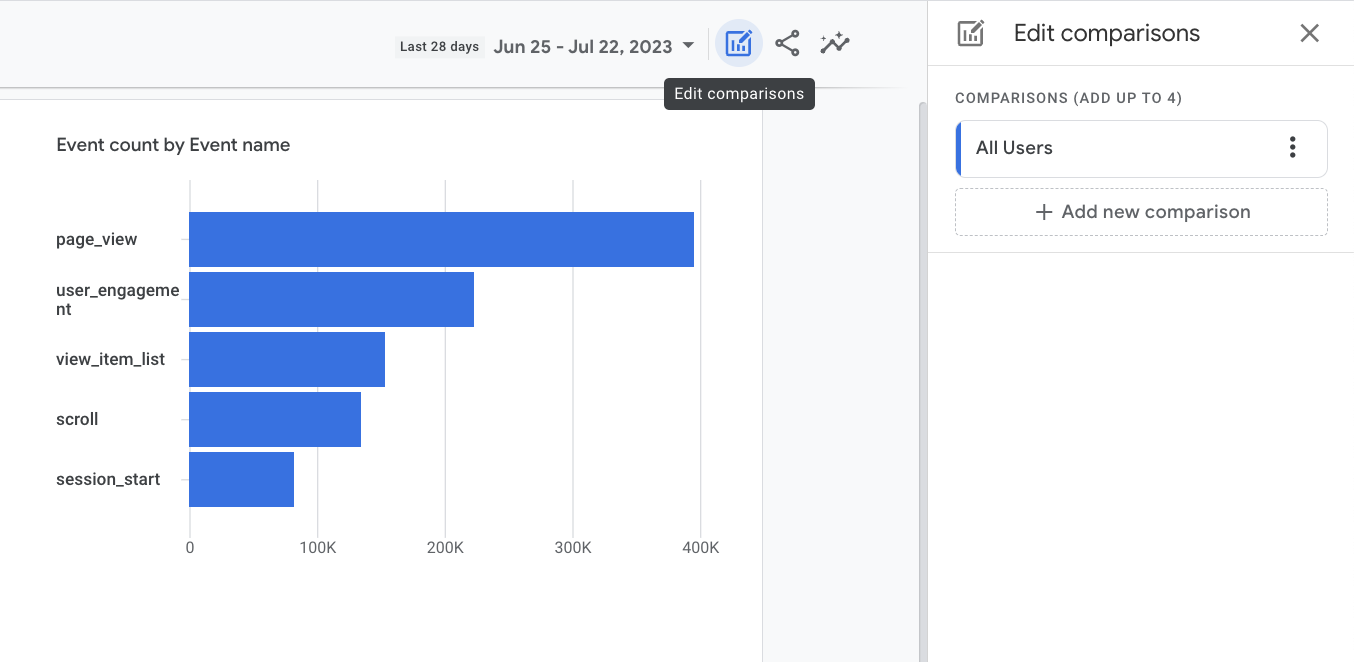
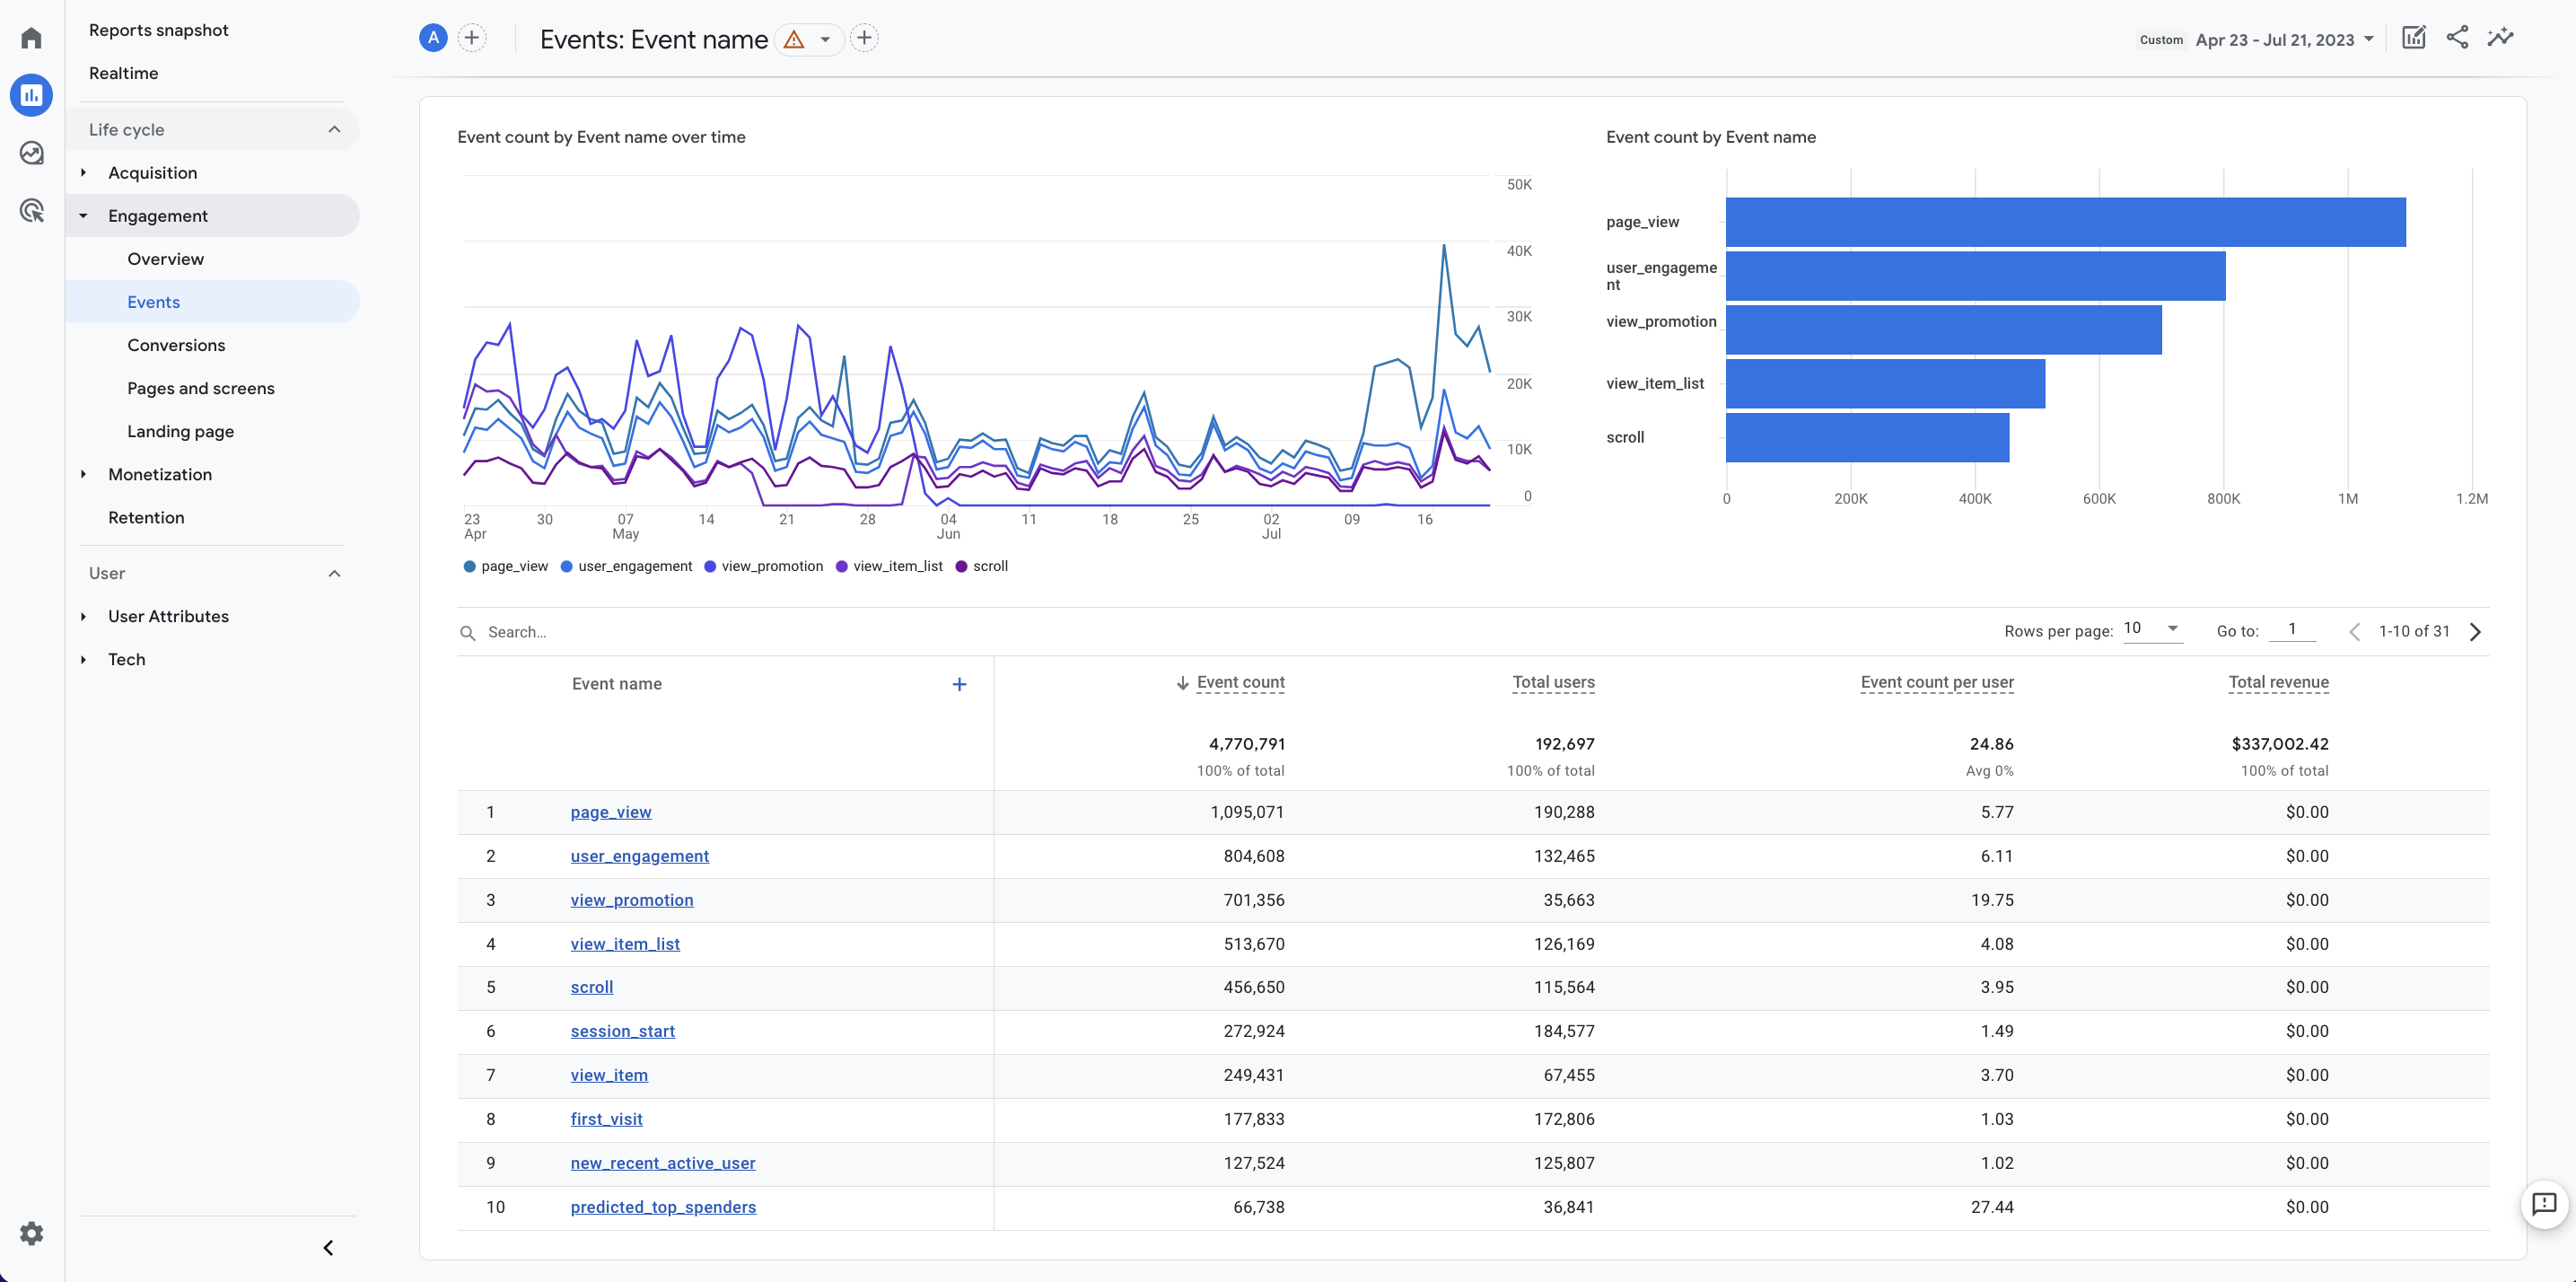
Here’s how event data is organized in a sample account:
At the top, you can change the time period being analyzed. And, as you’ll see near the end of this article, with the right tracking tags in place, you can also sort events by source, like an individual marketing email.
You can even use the right-side toggles to create a comparison to quickly see how email traffic stacks up to visitors who originate from other sources.
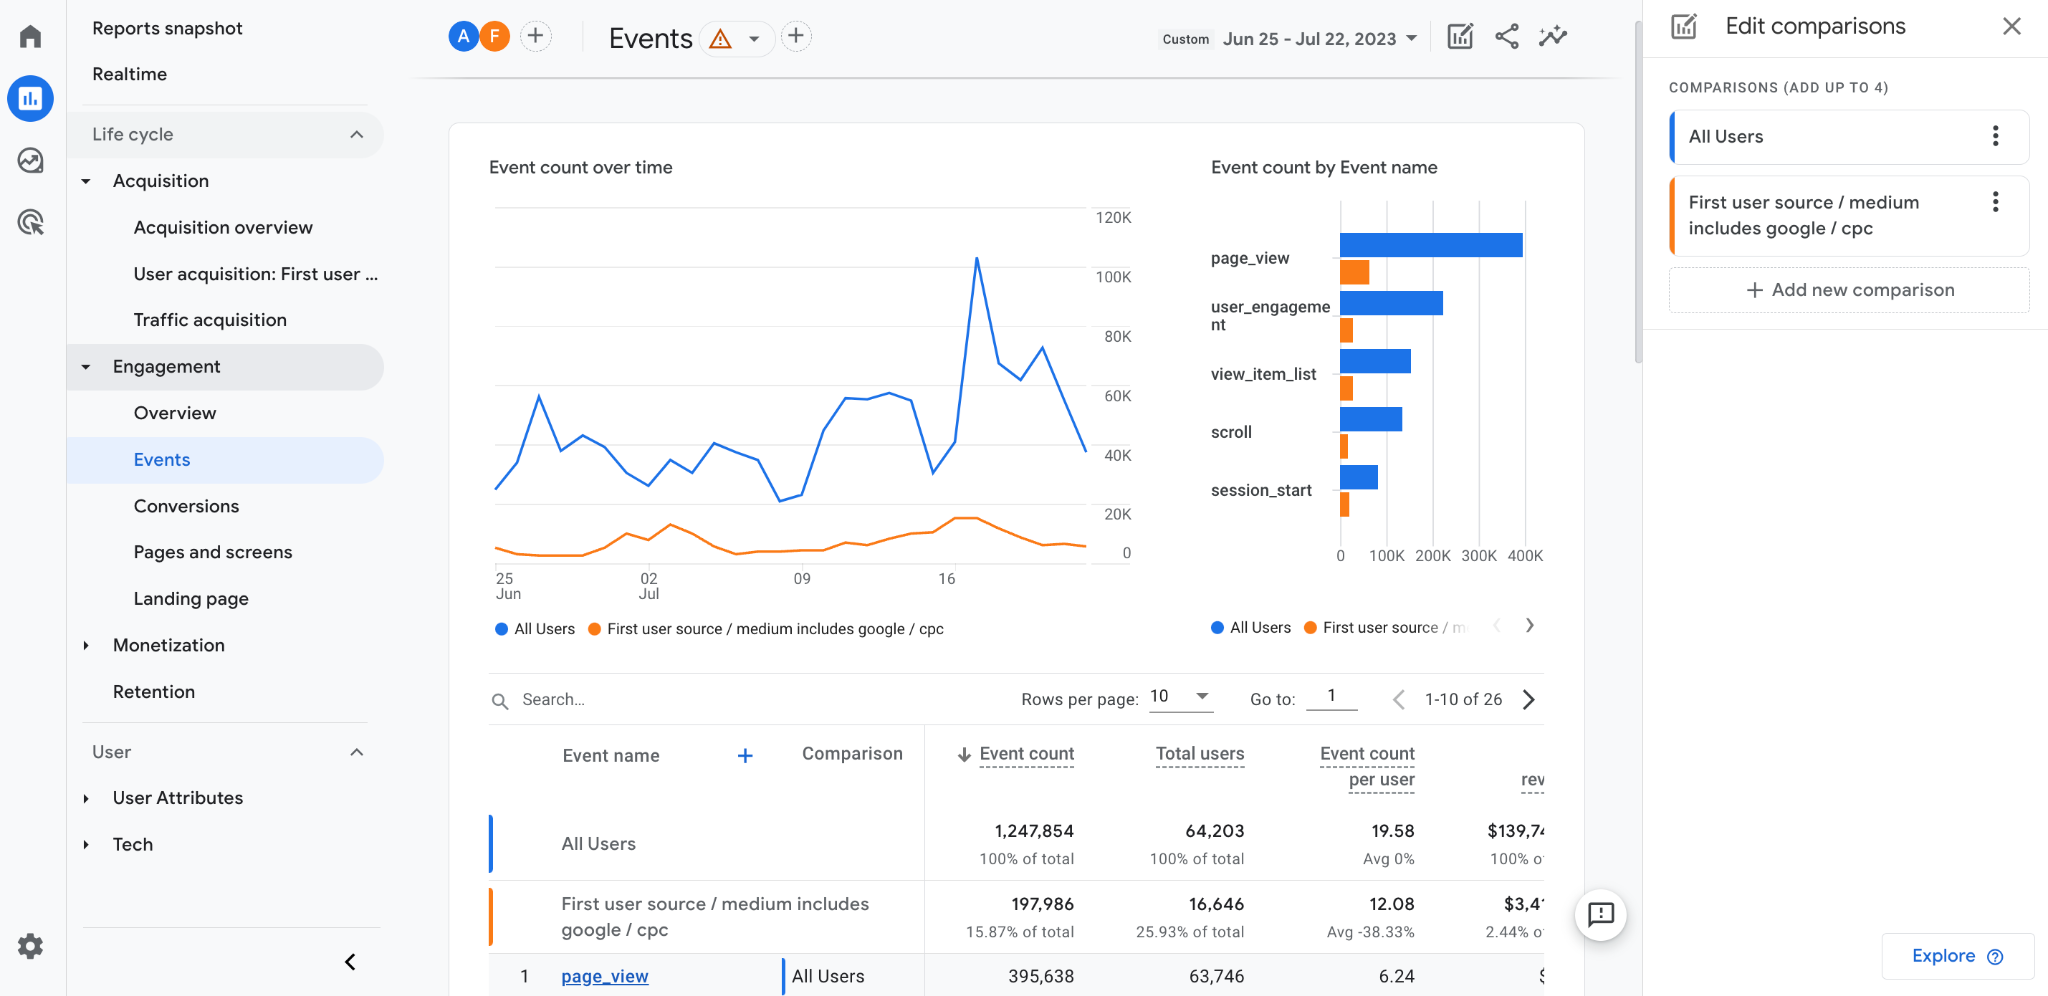
Once you’ve entered traffic sources for the comparison to populate, you’ll see something like this:
In the example above, we compared all traffic with visitors who originated from Google CPC ads. You could select “(not set) / email” to compare all email traffic with visitors from other sources.
However, once you understand and implement the UTM parameters explained in the next section, you can dramatically improve the focus of your comparisons by selecting individual email campaigns.
Custom events
Beyond the default events, you can also set up custom events to measure things more specific to your goals. You can do this through the Google tag or Google Tag Manager.
Custom events are like mini “conversions” as they signal successful visitor interactions that are specific to your goals as an organization.
Conversions
If certain actions, other than a final conversion goal like making a purchase, are particularly important milestones for your business, consider designating these as conversions in Google Analytics 4.
This can help you better attribute value to your email marketing program. For ecommerce, a “begin checkout conversion” is highly useful. However, there are many different options from completing a registration form or downloading a white paper to requesting a free trial.
UTM parameters: The key to more advanced insights
Even with the advancements of Google Analytics 4, tracking user behavior from email visitors falls a bit short of the ideal.
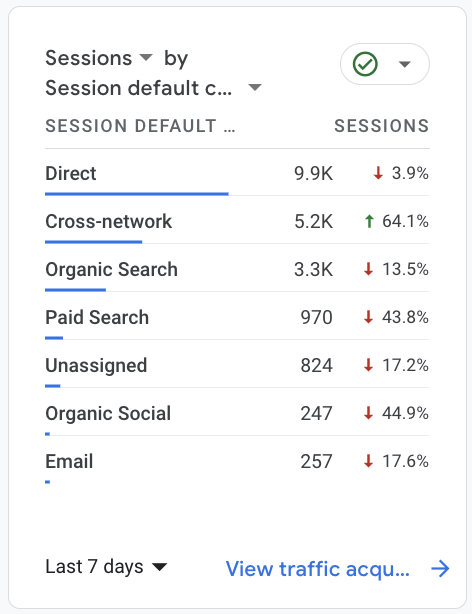
You might see something like this on your home screen:
That’s great – you know that email is your fifth-highest generator of session traffic. But “email” is pretty generic.
In a perfect world, you’d be able to compare and contrast the performance of certain campaigns, individual emails, or even specific links within particular emails. The good news? This world exists.
You know those super long links you’ve seen in your browser? They look something like this: “example.com?utm_source=mailjet&utm_medium=email&utm_campaign=google_analytics_intro.”
These complicated-looking – but easy-to-create – trackable URL strings hold the power to segment data within Google Analytics so you can unlock more information for your data analytics team (even if that person is just you).
UTM parameters explained
The extra characters in the example above are called UTM (Urchin Tracking Module) parameters, and they have several fields – some mandatory and others optional – that you can fill out:
Medium (mandatory): This represents the kind of traffic generated. Your campaign medium would likely just be set as “email.”
Source (mandatory): This is intended to be the more specific location of where traffic originated. Email marketers could use the campaign source field to include a specific email list.
Campaign (mandatory) Use this field to note a specific email campaign name (June newsletter, holiday preview series, etc.).
Term (optional): Since this is not one of the required fields, you may want to leave this blank for email tracking.
Content (optional): Use this to note a specific link within an email for which you want to measure performance.
u003cbu003ePro tip: u003c/bu003eUTM parameters are case sensitive. So be very intentional with how you create them!
How to implement UTM tagging
While you can certainly manually create tags for every link, it’s better to use a tool. Google’s URL builder tools allow you to input answers for the parameters and it will spit out a ready-to-use link! It’s that easy.
If you use Mailjet, adding UTM tags for your campaigns is simple and provides accurate, consistent data. You can do this with the custom URL builder linked above, or you can follow these instructions for account-wide implementation:
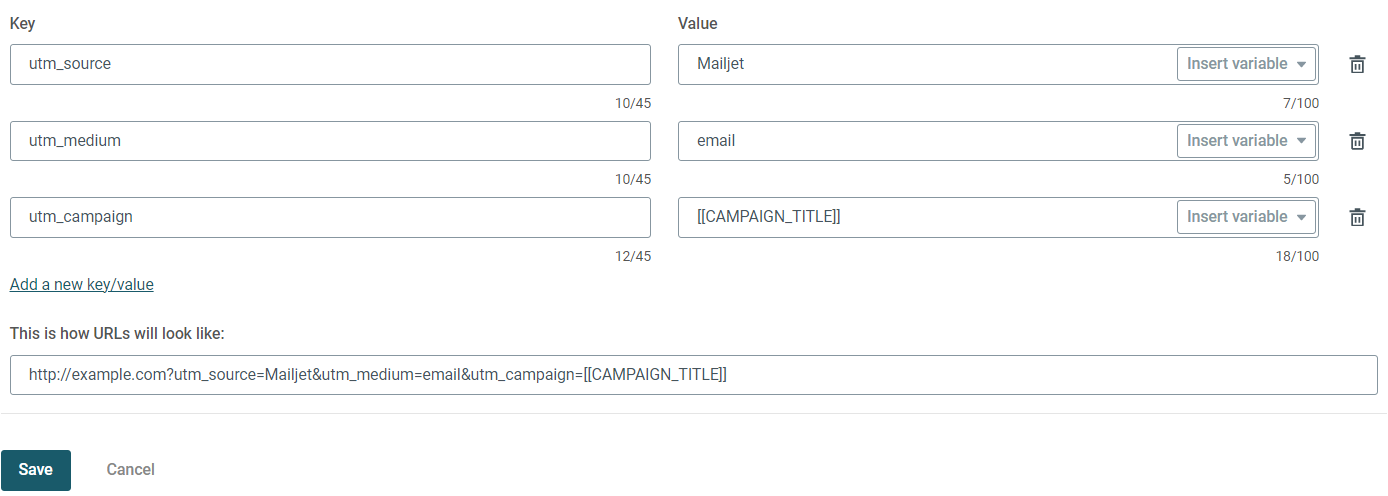
Step 2 – Enable the toggle for, “Track clicks using Analytics tags – campaigns only”. Note that, once this is activated, it will take effect across all sub-accounts.
Step 3 – A new section with available parameters will appear.
Step 4 – Enter values for the parameters you want to track (source, medium, etc.) and the name you want to assign to those parameters.
That’s it! UTM tags will now be automatically added to all your future URLs.
u003cbu003ePro tip:u003c/bu003e Be sure to document your chosen values and keep a consistent naming convention so anyone on your team can decipher the data or properly create new ones when you’re on a (well-deserved) vacation.
How to work with your new email tracking capabilities
With the advent of Google Analytics 4, you can see more than ever before. But now, with your links properly tagged, this amazing data won’t be lumped into one big mysterious “email” campaign source group!
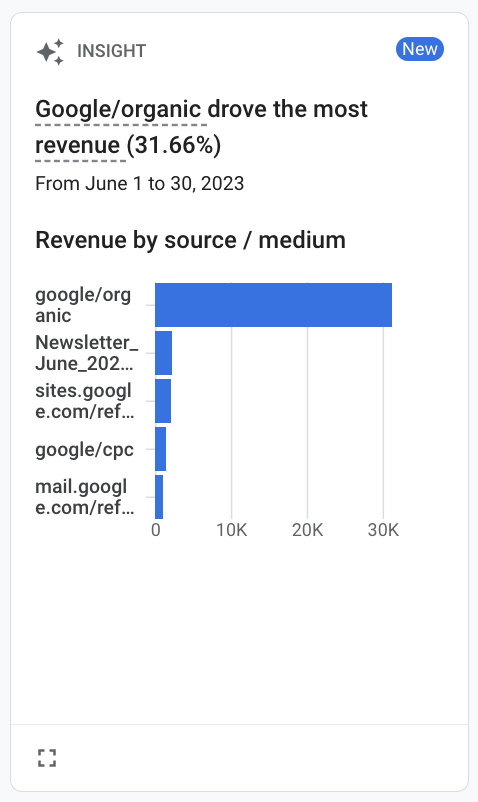
Now, the revenue insight on your Google Analytics 4 home page might look something like this:
You now know that your June 2023 newsletter generated the second most revenue on your site for the given time period!
Email event tracking example in Google Analytics 4
Below, we’ll show you an example of how you can find event data about specific email campaigns and compare the performance of different campaigns against each other or other marketing efforts. There are nearly limitless possibilities when it comes to the kinds of reports you can run within GA4, so be sure to keep learning each day!
View event insights about a specific campaign
Remember, engagement (measured by events) is a big upgrade in Google Analytics 4. You can see how traffic behaved as a whole, or how visitors from specific campaigns interacted with your site.
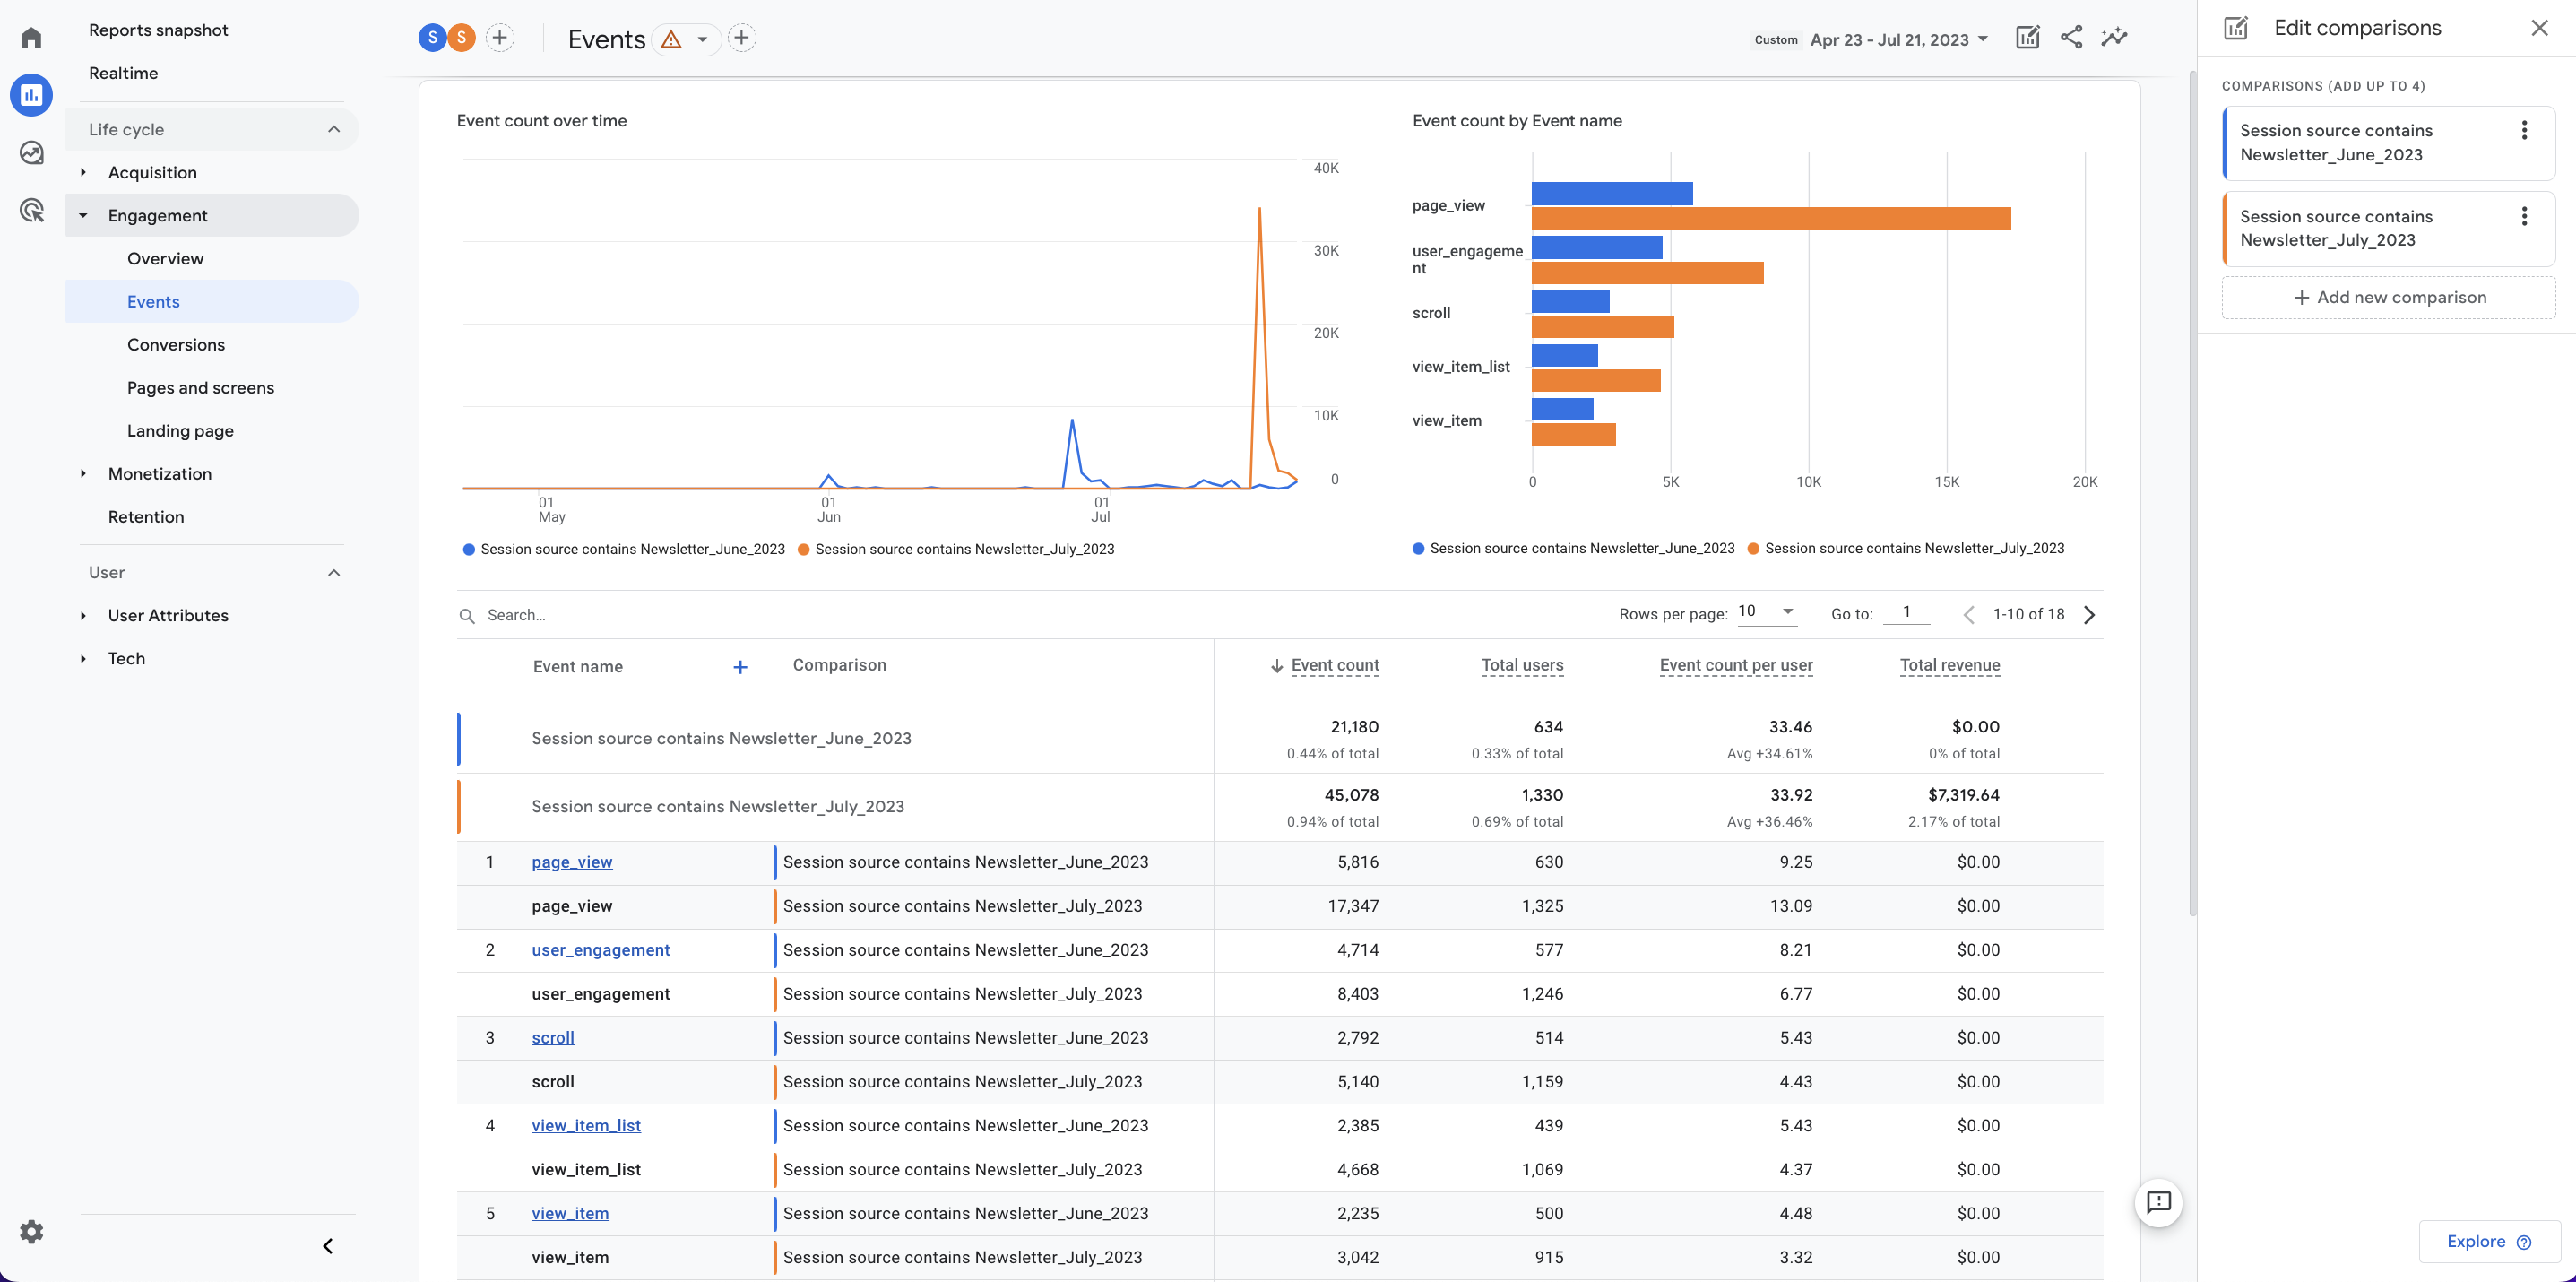
To see event metrics go to Reports → Engagement → Events from the left menu.
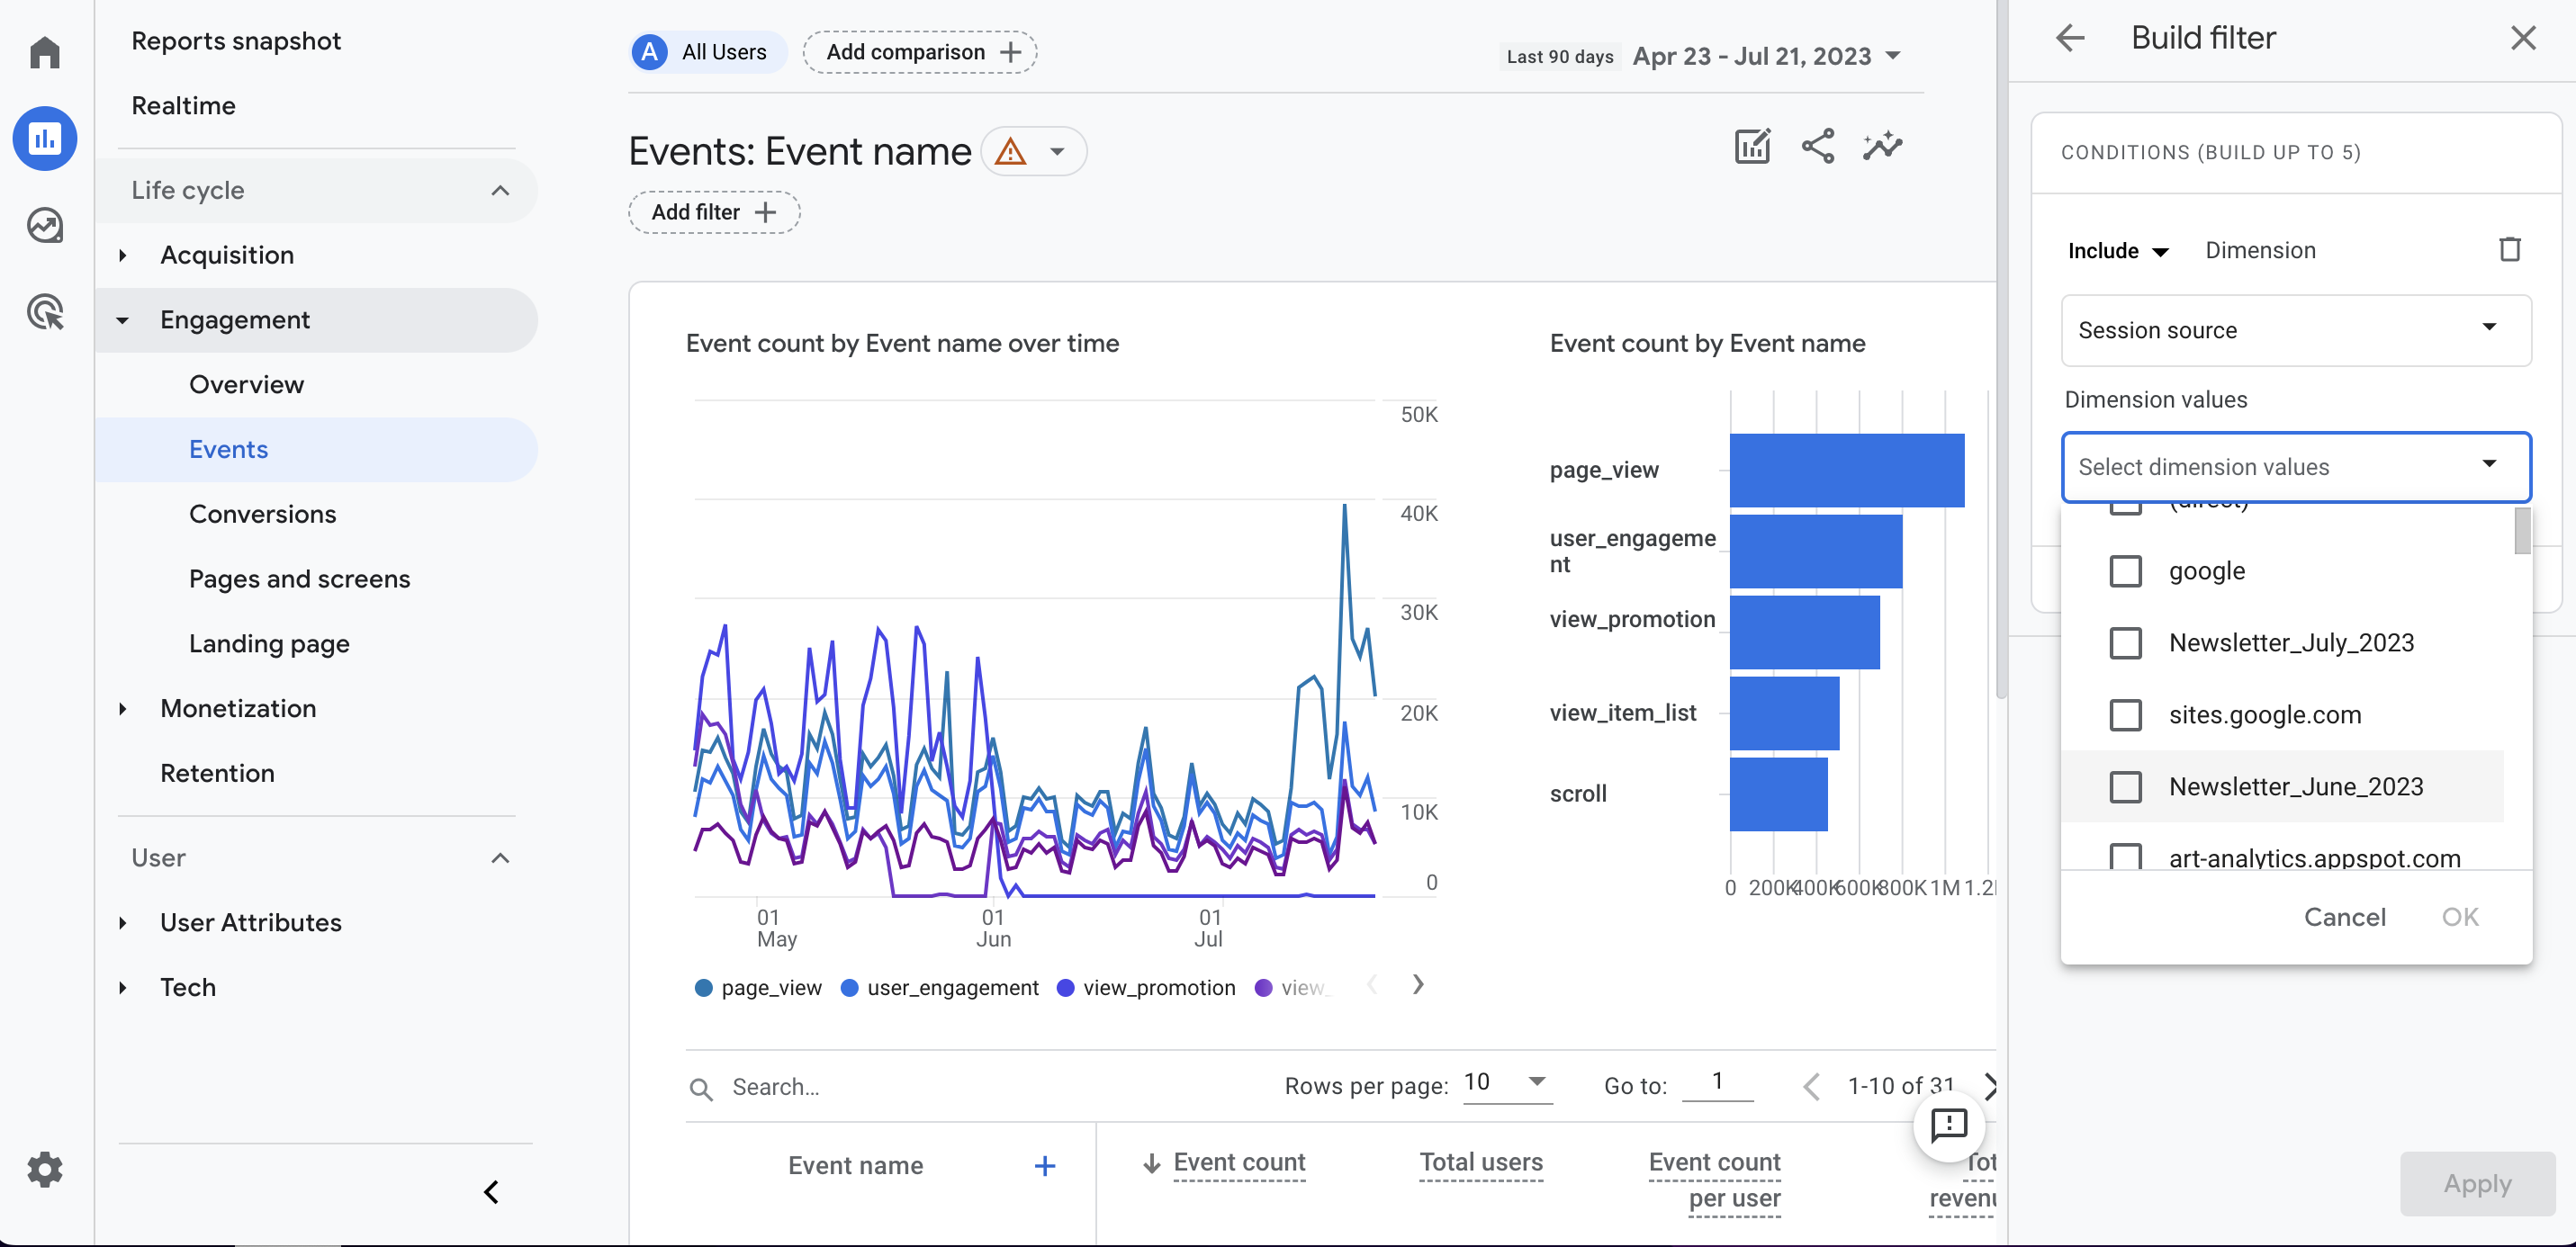
To filter results on almost any report, click the “+ add filter” toggle at the top of the screen.
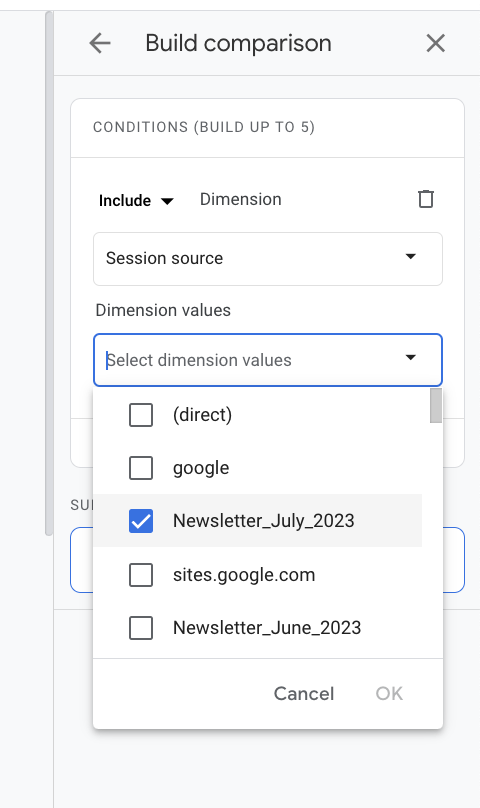
Then select your desired dimension, like “Session source”, and then the value you want to measure, like “Newlsetter_June_2023”. Click Apply.
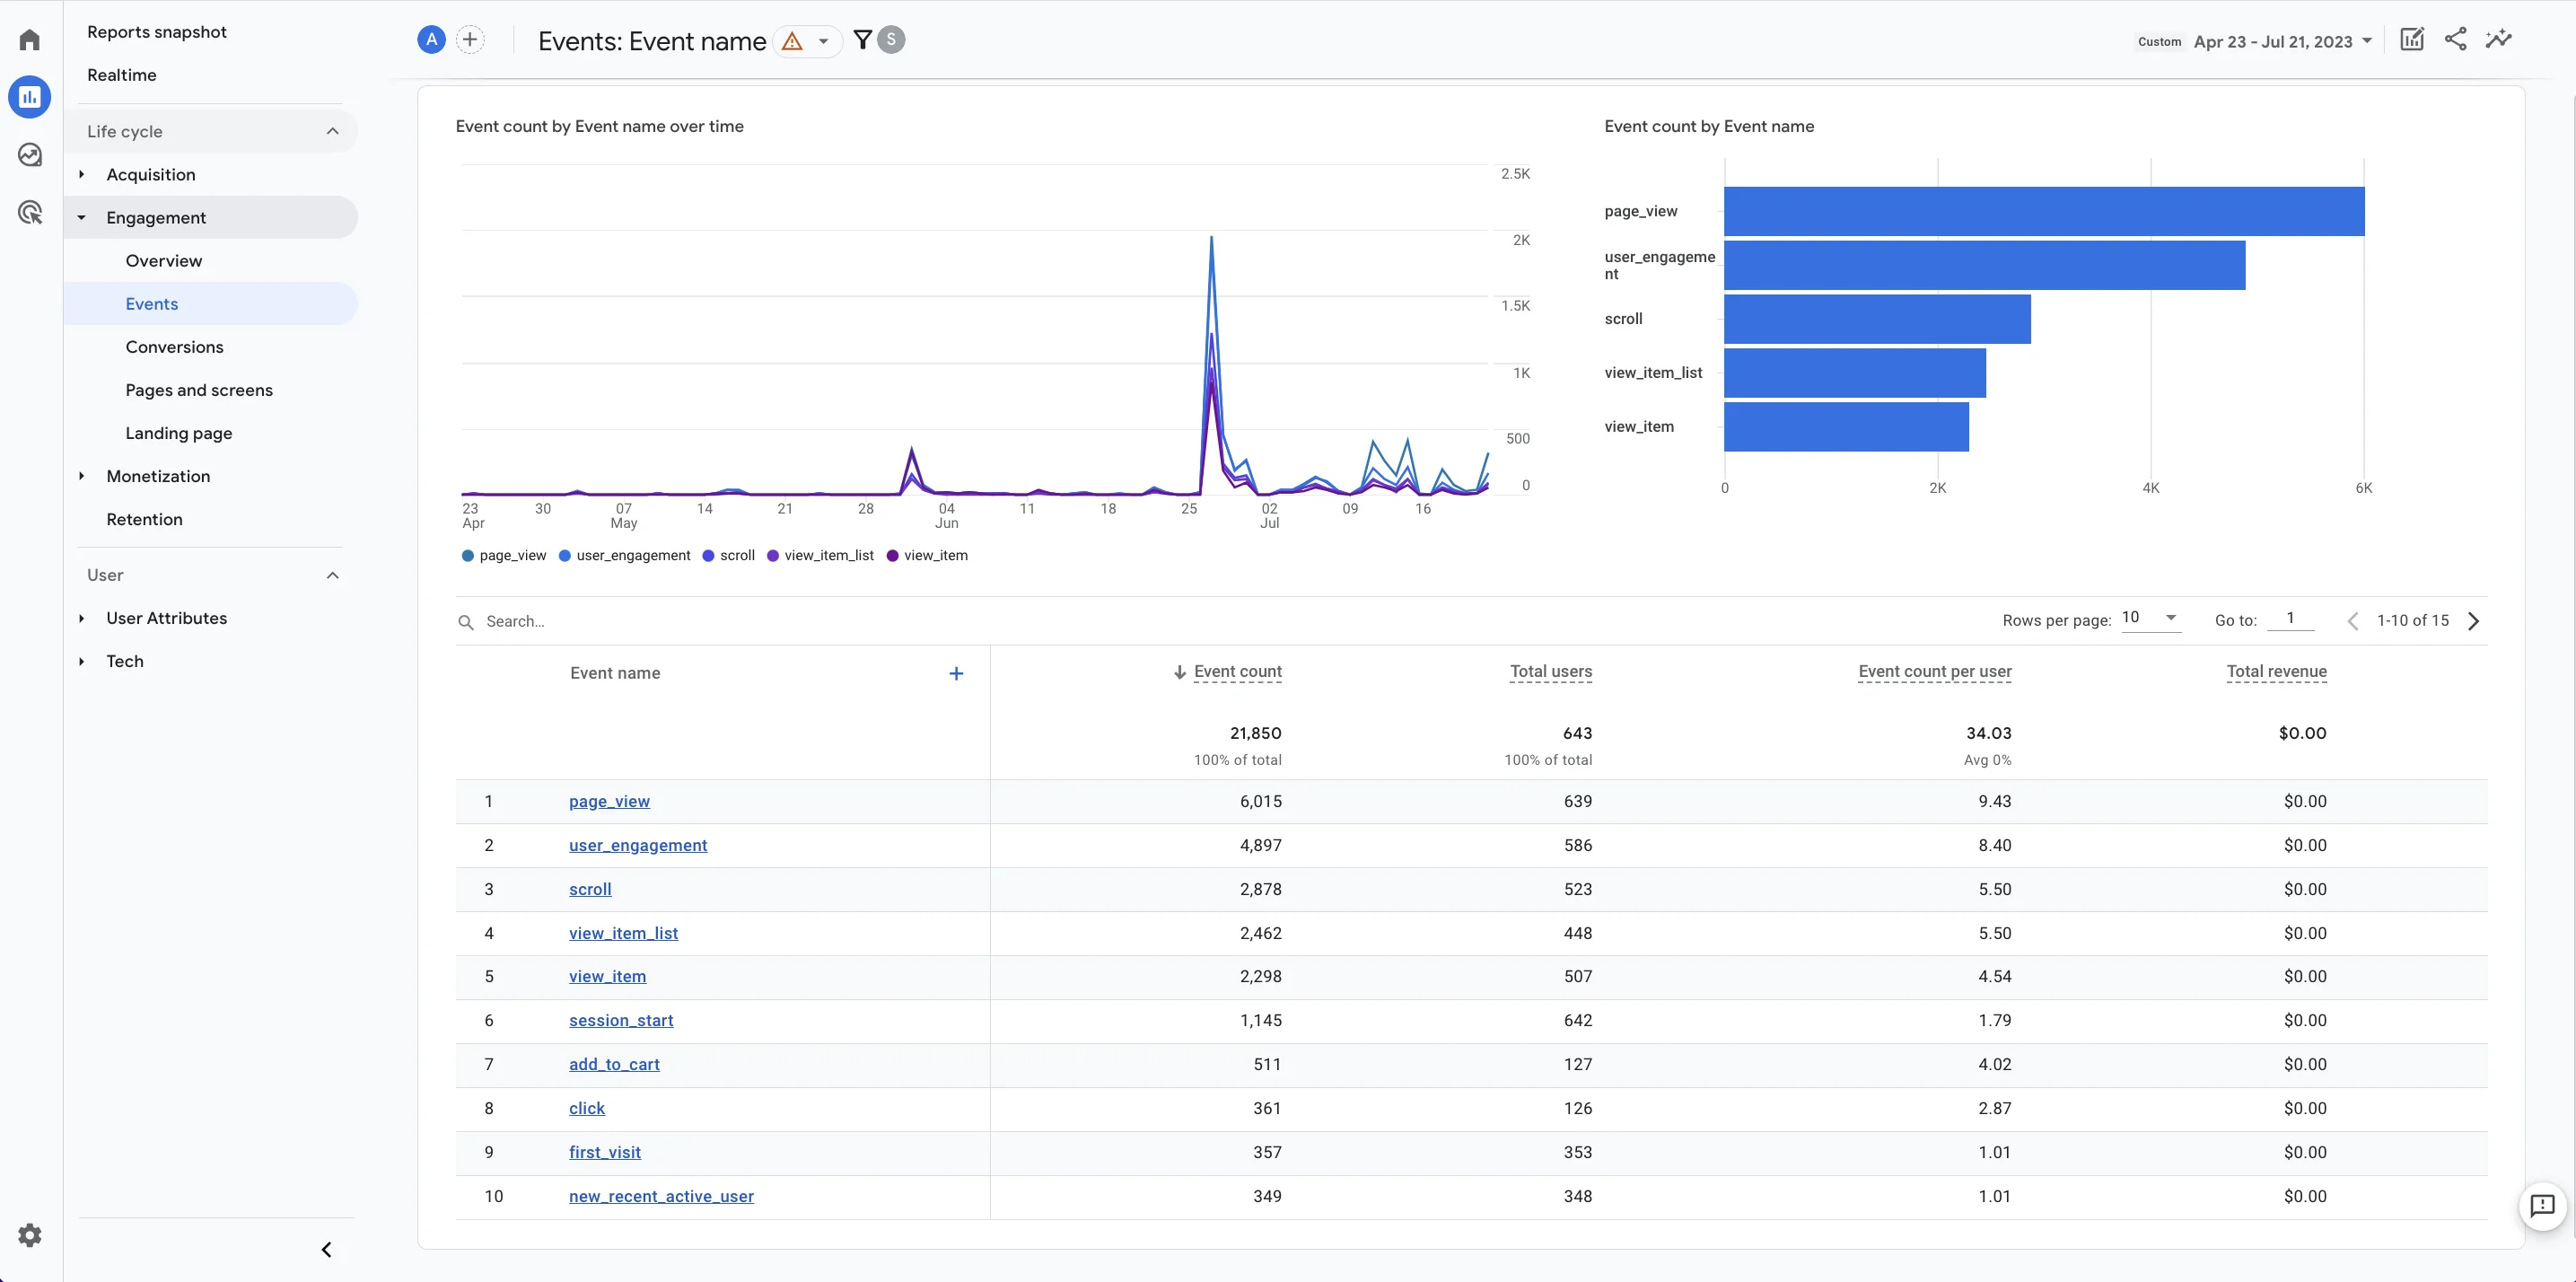
You can now see event statistics specific to that particular email.
Create comparisons between two emails or traffic sources:
To create comparisons between different emails, go to the toggle at the top right.
In our example, we used the dimension “session source” for both variables, and the July and June emails as the dimensions for our two comparisons.
Note that you can compare anything with usable data, so you could select “direct” as your session source value if, for example, you wanted to compare traffic from an email campaign with visitors who arrived on your site directly.
You can now see a full comparison of the two campaigns!
Take your email marketing campaigns further
Google Analytics 4 offers more information than ever before to understand how visitors interact with your site and how different sessions contribute to a final conversion.
Reviewing this data should be a regular part of your marketing strategy development.
And now that you know how to use UTM parameters to track clicks from specific campaigns, or even specific links within the same campaign, it’s time to set off and explore how you can use email more effectively each day.
There are official Google Analytics courses you can follow to learn more about the available reports and how to work with your new email marketing data. Plus, the Mailjet blog has plenty of information to help you take your email skills to the next level. So, subscribe to our newsletter to be the first to get our content in your inbox!
Keep me posted! Subscribe to our newsletter to get great resources sent right to your inbox.
Check your inbox monthly for your Mailjet Newsletter!
Most people would agree cookies make life better. For us, they help us make our site and marketing better. But if you don’t like cookies, that’s cool – you can let us know by clicking the settings button!
Your Cookie Choices
When you visit any web site, it may store or retrieve information on your browser, mostly in the form of cookies. This information might be about you, your preferences or your device and is mostly used to make the site work as you expect it to. The information does not usually directly identify you, but it can give you a more personalised web experience. Because we respect your right to privacy, you can choose not to allow some types of cookies. Click on the different category headings to find out more and change our default settings. However, blocking some types of cookies may impact your experience of the site and the services we are able to offer. Cookie Statement
These cookies are necessary for the website to function and cannot be switched off in our systems. They are usually only set in response to actions made by you which amount to a request for services, such as setting your privacy preferences, logging in or filling in forms. You can set your browser to block or alert you about these cookies, but some parts of the site will not then work. These cookies do not store any personally identifiable information.
Cookie details
These cookies allow us to count visits and traffic sources so we can measure and improve the performance of our site. They help us to know which pages are the most and least popular and see how visitors move around the site. All information these cookies collect is aggregated and therefore anonymous. If you do not allow these cookies we will not know when you have visited our site, and will not be able to monitor its performance.
Cookie details
These cookies enable the website to provide enhanced functionality and personalisation. They may be set by us or by third party providers whose services we have added to our pages. If you do not allow these cookies then some or all of these services may not function properly.
Cookie details
These cookies may be set through our site by our advertising partners. They may be used by those companies to build a profile of your interests and show you relevant adverts on other sites. They do not store directly personal information, but are based on uniquely identifying your browser and internet device. If you do not allow these cookies, you will experience less targeted advertising.
Cookie details
These cookies are set by a range of social media services that we have added to the site to enable you to share our content with your friends and networks. They are capable of tracking your browser across other sites and building up a profile of your interests. This may impact the content and messages you see on other websites you visit. If you do not allow these cookies you may not be able to use or see these sharing tools.
Cookie details